
Yes, you can make a green bean casserole ahead of time, and it's one of the smartest moves for holiday entertaining. The real question isn't whether to do it, but when and how to do it without ending up with a soggy, watered-down dish on the table.
The good news is there's flexibility here. According to USDA food storage guidelines, a green bean casserole can safely keep in the refrigerator for one to two days before baking, or in the freezer for up to three months. The trick is understanding which components can handle the wait and which ones need special handling.
Can You Make It Ahead? The Short Answer
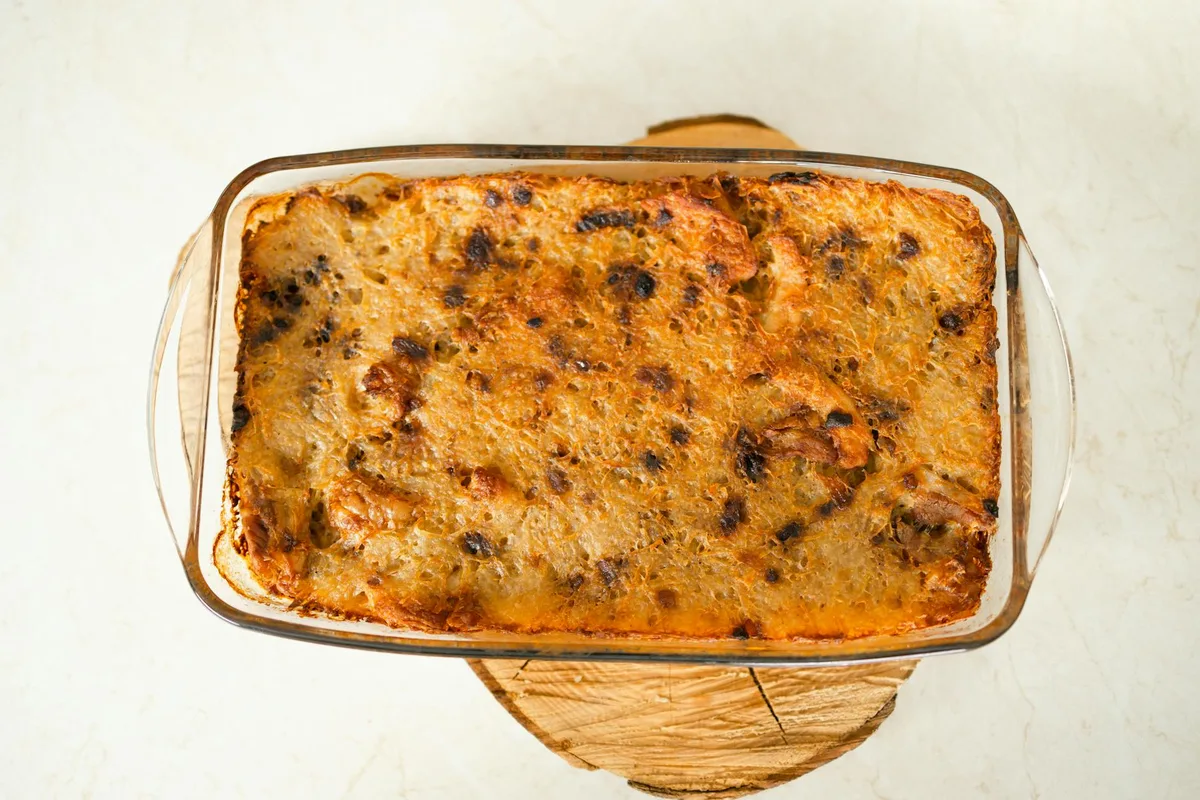
Yes. Most of the components in a green bean casserole hold up well to advance prep. The dish is built on canned green beans, cream of mushroom soup, and fried onions, all of which tolerate storage without falling apart. Where people run into trouble is mixing everything together and letting it sit for days, which leads to the beans softening into the sauce and the whole thing becoming mushy.
The practical window depends on your method. Unbaked casseroles assembled in a baking dish stay good in the fridge for one to two days before baking. If you freeze it, you get much longer, usually two to three months before quality starts to drop. The topping (those crispy fried onions) is the wildcard: add them before storage and they'll go soft.
Add them after and you keep the crunch.
The best approach for most home cooks is to prep components separately and assemble the casserole the day before serving, or to freeze the assembled dish without the topping. Both methods give you the convenience without the texture problems.
The Three Variables That Change Everything
When you're deciding how far ahead to make your casserole, three things matter: storage method (fridge or freezer), how much you assemble beforehand, and whether you're adding the topping before or after storage.
Storage Method. The refrigerator keeps everything at 40°F or below, which slows bacterial growth but doesn't stop the breakdown of texture over time. Freezing at 0°F essentially pauses the casserole in time, preserving it much longer but requiring a thaw-and-reheat cycle. Each has different prep implications.
Assembly Timing. You can prep individual ingredients, assemble the full casserole without topping, or assemble it completely. Each option changes how long it lasts and how it tastes after storage. A dish with beans and sauce mixed together for days will taste different (and look wetter) than one assembled fresh.
Topping Strategy. Fried onions are moisture-sensitive. Left on the casserole during storage, they absorb condensation and go limp. Added after heating, they stay crispy. This single choice shapes the whole approach.
Make-Ahead Timeline: How Far in Advance Can You Go?
Here's what you need to know about timing, based on your storage method.
Refrigerator Storage: 1 to 2 Days Maximum
An unbaked casserole assembled in your baking dish will keep safely for one to two days in the fridge. The beans stay firm, the sauce stays blended, and nothing spoils. After two days, the beans start absorbing excess moisture from the sauce, turning soft and the overall dish watery. Three days is pushing it, and four days or more is a food safety risk with the cream-based sauce.
If you've already baked the casserole, it lasts a bit longer in the fridge, up to three or four days, because the heat has already fused everything together and condensed the moisture. Still, texture suffers as it sits.
Freezer Storage: 2 to 3 Months
Frozen casseroles last much longer because the cold essentially stops all breakdown. Most sources recommend two to three months as the practical window before ice crystals form or freezer burn affects the taste. After three months, the casserole is still safe to eat, but quality drops noticeably.
The thaw-and-bake process takes time. Plan for at least six to eight hours in the refrigerator overnight, or use a quick thaw if you're short on time. Never thaw on the counter, which risks bacterial growth.
Component-Only Prep: 3 to 5 Days
If you prep ingredients separately, the timeline changes. Cooked green beans, drained and stored in a covered container, last three to five days in the fridge. The cream of mushroom soup keeps the same. Keeping them apart means they don't exchange moisture, so texture stays better.
You assemble the casserole the day before baking for the freshest possible result.
Component Strategy: What to Prep When
Breaking the casserole into parts is how you extend your prep window without sacrificing quality. Here's which components you can prep ahead and how far ahead you can go.
Green Beans
If you're using fresh green beans, trim them and blanch them two to three days ahead. Store them in a sealed container in the fridge. They'll stay firm and ready to go. If you're using frozen, there's no prep needed beyond draining before assembly.
Canned green beans are already cooked, so prep them just by draining off excess liquid the day before.
Cream Sauce
The cream of mushroom soup (or homemade sauce if you're making it from scratch) can be made one to two days ahead. Let it cool completely before storing in a sealed container. It actually deepens in flavor as it sits. If you're making a homemade version with butter, flour, and cream, the same rule applies: prepare it early and refrigerate.
Fried Onion Topping
Here's the critical rule: don't add fried onions until after the casserole is hot and ready to serve, or at minimum, not more than a few hours before baking. The moisture in the oven will soften them no matter what. Store them in an airtight container at room temperature. Some cooks sprinkle half on before baking and half on top right after to balance crunch and flavor.
Full Assembly
If you're assembling the whole thing (beans, sauce, and a layer of onions), keep it to one to two days in the fridge maximum. The beans and sauce will interact, and the onions will gradually soften. For longer storage, freeze the casserole without the topping, then add fresh onions after baking.
Your Two Main Paths: Refrigerate vs. Freeze
Once you understand what lasts how long, the decision breaks into two clear strategies: the short-term fridge approach or the long-term freezer approach. Each one works, and which you choose depends on your timeline.
Path 1: The Refrigerator Method (1 to 2 Days Ahead)
This is best if you're making the casserole for an event one to two days away. Assemble the unbaked casserole in your baking dish, cover it tightly with plastic wrap or foil, and refrigerate. The components stay fresh and the texture holds. When it's time to bake, pull it from the fridge and add 5 to 10 extra minutes to the baking time since it takes longer to heat through from a cold start.
If you want to play it safe with texture, prep the components separately and assemble the casserole the morning of your event. This gives you the convenience of having your ingredients ready without any risk of sogginess.
Path 2: The Freezer Method (Up to 3 Months Ahead)
Choose this if you're planning weeks or months ahead, or if you want maximum flexibility on your cooking day. Assemble the casserole in a freezer-safe baking dish, omit the fried onions, wrap it tightly in foil or plastic, and freeze. You can also freeze it in a disposable aluminum pan if you want to save your good dishes. Using quality containers for freezing ensures your casserole stays protected from freezer burn.
Thaw overnight in the fridge before baking. The casserole will take slightly longer to bake than a freshly made one, plan for 50 to 60 minutes instead of 30 to 40. Add the fried onions in the last five minutes of baking so they stay crispy, or sprinkle them on top fresh from the oven.
The Hybrid Approach
Some cooks prep components separately, freeze them in portions, and assemble the casserole from frozen parts. This is the most flexible method. Freeze your beans and sauce in separate containers, then combine them fresh or after a quick thaw. You get the convenience of advance prep without the texture risk.
This mirrors the strategy used in freezer meal preparation, where components stay separate until assembly.
How to Refrigerate Green Bean Casserole (1-2 Days Ahead)
The refrigerator method is straightforward. Assemble everything except the fried onions in your baking dish, cover tightly, and you're done. The casserole will keep safely for one to two days before baking.
Start by mixing your drained green beans with the cream of mushroom soup and any seasonings you're using. Stir in milk if your recipe calls for it to loosen the sauce. Transfer to a baking dish and smooth the top. Cover the dish tightly with plastic wrap or foil, pressing it against the surface to minimize condensation.
Label your dish with the date if you're prepping multiple casseroles. This is useful during busy holidays when you're juggling several dishes at once. Place it on a shelf where it won't get bumped, preferably away from the back of the fridge where temperatures fluctuate.
When you're ready to bake, pull the casserole from the fridge about 15 minutes before placing it in the oven. This helps it heat more evenly. Bake at 350°F for 40 to 50 minutes, covering the dish loosely with foil for the first 20 minutes to prevent the top from browning too quickly. Uncover for the last 20 to 30 minutes to let it bubble gently.
Sprinkle fresh fried onions on top about five minutes before the casserole finishes baking so they stay crispy.
The casserole is done when it's heated through and the edges are bubbling gently. A thermometer should read around 165°F in the center if you want to be precise.
How to Freeze Green Bean Casserole (Up to 3 Months Ahead)
Freezing gives you the most flexibility, letting you prep the casserole weeks or months ahead. The process is almost identical to the refrigerator method, with one key difference: you skip the fried onion topping.
Assemble the casserole without the onions in a freezer-safe baking dish. Glass and ceramic work fine, or use disposable aluminum pans if you want to save your everyday dishes. Cover the dish tightly with plastic wrap, then wrap the whole thing again in foil to prevent freezer burn. A tight double layer keeps ice crystals and freezer odors from affecting the casserole.
Alternatively, you can use quality freezer storage bags. Transfer your assembled casserole mixture into a gallon-size freezer bag, flatten it, label it with the date, and lay it flat in the freezer. This saves space, though you'll lose some texture definition in the final dish. For the cleanest approach, use dedicated freezer containers designed to minimize air exposure.
Frozen casseroles keep for two to three months in good condition. After three months, freezer burn becomes more likely and the flavor starts to fade, though the dish is still safe to eat.
To use a frozen casserole, thaw it overnight in the refrigerator. Never thaw on the counter, which lets bacteria multiply. Once thawed, bake it like a freshly made casserole but plan for 50 to 60 minutes at 350°F since it'll be colder starting out. The baking time varies depending on your oven, so check for gentle bubbling around the edges and a thermometer reading of 165°F.
Add fresh fried onions in the last five minutes of baking, or sprinkle them on top right after the casserole comes out of the oven. This keeps them crispy and gives you the texture contrast the dish needs.
The Moisture Problem: Why Casseroles Get Watery
The most common complaint about make-ahead casseroles is that they get watery. Understanding why this happens helps you prevent it.
Green beans release moisture as they sit in a liquid environment. The cream of mushroom soup contains water, and as the casserole sits in the fridge, osmosis pulls additional moisture from the beans into the surrounding sauce. This is especially pronounced if you assembled the casserole more than two days ahead.
Another moisture source is condensation. When you cover a warm or room-temperature casserole and refrigerate it, steam condenses on the inside of the plastic wrap and drips back down into the dish. This is why cooling the casserole completely before covering it makes a difference.
If you're freezing, condensation happens again during thawing. The casserole sweats as it warms up from frozen. Wrap it well to minimize this, and don't skip the thaw cycle. Thawing slowly in the fridge rather than at room temperature lets condensation drip away more gradually instead of pooling in the dish.
The third factor is the cream of mushroom soup itself. Commercial versions are designed to be shelf-stable, not delicate. They break down slightly over time, releasing more liquid. If you're making sauce from scratch with cream and stock, it's more stable but still susceptible to weeping if the casserole sits too long.
The Topping Dilemma: Crispy Onions Before or After?
The fried onion topping is where most make-ahead casseroles fail texture-wise. The onions are hygroscopic, meaning they absorb moisture from the air and the casserole itself. The longer they sit exposed to humidity, the soggier they become.
The rule is simple: add fresh fried onions after the casserole is hot, never before storage. If you assemble the full casserole with onions and refrigerate or freeze it, they'll be soft and limp by the time you bake and eat it. That defeats the purpose of the dish.
Some cooks use a compromise approach. They add half the onions mixed into the casserole mixture before baking, which adds flavor throughout, then sprinkle the remaining fresh onions on top right before serving. This gives you onion flavor in every bite plus crispy texture on top.
If you're freezing the casserole, never add the topping before freezing. Once the casserole is baked and heated through, top it with fresh fried onions in the last few minutes of baking. They'll soften slightly from the heat but stay crunchy enough to deliver the textural contrast. You can also sprinkle them on after the casserole comes out of the oven if you want maximum crispness.
For refrigerated casseroles baked the same day or next day, you can add a thin layer of onions 30 minutes before baking. They'll soften a bit during baking but stay reasonably crispy. Keep a second batch of fresh onions ready to scatter on top right before serving.
Reheating and Baking Your Make-Ahead Casserole
The baking instructions change slightly depending on whether your casserole is freshly assembled, refrigerated, or thawed from frozen.
Freshly Assembled, Room Temperature
Bake at 350°F for 30 to 40 minutes, covered loosely with foil for the first 20 minutes. The casserole is done when it's heated through and bubbling gently at the edges. Center temperature should reach 165°F. Add fried onions in the last five minutes.
Refrigerated, Cold from the Fridge
Increase baking time to 40 to 50 minutes. The cold casserole takes longer to heat through. Follow the same covering method: foil for the first half, uncovered for the second half. Check for gentle bubbling and use a thermometer to confirm doneness.
Add fresh onions in the last five minutes.
Frozen, Thawed Overnight in the Fridge
Plan for 50 to 60 minutes at 350°F. A thawed casserole is colder than one that's been in the fridge for a day or two, so it needs extra time. Cover loosely with foil for the first 25 to 30 minutes, then uncover to finish. Add fresh fried onions in the final five minutes or after baking.
Oven Temperature Matters
Always use 350°F as your baseline. Higher temperatures cook the casserole unevenly, browning the edges while the center stays cold. Lower temperatures take much longer and don't give you the gentle bubbling that signals doneness. If your oven runs hot or cold, adjust baking time but stick to the temperature.
The casserole is properly heated when the edges are bubbling gently and a thermometer inserted into the center reads 165°F. Aggregate user feedback on reheated casseroles confirms that this method prevents the interior from staying cold while the top browns.
Don't skip the foil for the first half of baking. It traps steam and helps the casserole heat evenly without the top drying out or over-browning. Remove it for the last half so any excess moisture evaporates and the top browns lightly.
Mistakes That Actually Ruin Make-Ahead Casseroles
Most casserole disasters happen because of one or two preventable mistakes. Knowing what goes wrong helps you avoid it entirely.
Mixing everything together three or more days ahead. The beans will absorb moisture from the sauce and turn mushy. The casserole develops a watery bottom layer and loses structure. Don't do this. Keep components separate or assemble no more than two days before baking.
Adding fried onions before storage. This is the single most common mistake. The onions sit in the fridge or freezer, absorb moisture from humidity and the casserole itself, and turn into soggy crumbles by baking day. Store onions separately in an airtight container at room temperature and add them fresh.
Thawing on the counter. This lets bacteria multiply in the danger zone (40°F to 140°F) for too long. Always thaw frozen casseroles overnight in the refrigerator. If you're short on time, submerge the sealed baking dish in cold water, changing the water every 30 minutes. Still takes time, but it's safer than counter thawing.
Baking from frozen without thawing. You'll end up with a cold, soggy center and an overcooked top. The frozen casserole takes much longer to heat through, and the extended baking time dries out the edges. Thawing solves this completely.
Not letting the assembled casserole cool before covering and refrigerating. Warm casseroles create condensation, which drips back into the dish as watery liquid. Let your casserole cool to room temperature, then cover and refrigerate.
Using a shallow dish instead of a deep one. Shallow dishes mean the casserole heats unevenly. You'll have a thick, concentrated layer on top and a thin, watery layer underneath. Use a standard 9×13 baking dish.
When Make-Ahead Really Saves You
Make-ahead casseroles aren't universally better. They're useful in specific situations where the convenience payoff is real.
Holiday entertaining with limited oven space. Thanksgiving and Christmas cooking demand oven real estate. When you're baking turkey, rolls, potatoes, and desserts simultaneously, a casserole that's ready to heat and serve frees up space and time. This is the classic use case. Prep it days ahead, freeze it, and slide it in for the final 50 minutes of baking while other dishes finish.
Busy weeknight dinners with advance notice. If you know Tuesday nights are chaotic, assemble the casserole Monday evening and bake it Tuesday. You still get a hot home-cooked meal without the stress of prep on a hectic day.
Feeding a crowd on a specific date. Potlucks, family gatherings, and events with set start times benefit from make-ahead casseroles. You control the cooking timeline instead of rushing at the last minute.
When you've got time now but not later. Some weekends you have an hour to prep. Using that time to assemble casseroles for the freezer spreads your effort across multiple cooking days. You trade one hour of prep for convenience later.
Occasions where you're hosting and cooking multiple dishes. Make-ahead casseroles let you delegate one dish to advance prep, freeing mental energy and oven capacity for last-minute components that need attention.
Make-ahead casseroles are less useful if you've got ample oven space, no time pressure, and you prefer everything cooked fresh. Fresh assembly takes 10 minutes, and the texture is noticeably crisper. If that matters more than convenience, skip the advance prep.
Your Decision Guide: Which Path Is Right for Your Situation?
Use this framework to decide whether to make your casserole ahead and which method to use.
If your event is tomorrow or the next day, and you've got time today. Assemble the unbaked casserole this afternoon or evening, cover it tightly, and refrigerate. Bake it tomorrow, adding 5 to 10 extra minutes to account for the cold start. Add fresh fried onions in the last five minutes. This keeps texture perfect with zero fuss.
If your event is tomorrow and you're short on time today. Prep components separately instead of assembling. Drain and store the beans in one container, keep the sauce in another, and keep the onions in their original package. Assemble the casserole fresh tomorrow morning, then bake. You get the advantage of fresh assembly without the last-minute stress of chopping and measuring.
If your event is one week or more away. Freeze the casserole assembled without the topping. Wrap it well to prevent freezer burn. Thaw overnight in the fridge, bake, and add fresh fried onions at the end. This gives you maximum flexibility and lets you prep during a calm moment instead of rushed week.
If you're juggling multiple dishes for a large event. Freeze one or two casseroles a week or two ahead. This spreads your prep load. Bake them during the event timeline when oven space opens up, rather than scrambling day-of.
If you prefer texture above all else. Make the casserole fresh the morning you're serving it. Assemble right before baking, skip the storage entirely, and add fresh onions afterward. You'll get the crispiest topping and firmest beans, though you lose the convenience advantage.
The decision comes down to your timeline and priorities. You can't optimize for both perfect texture and maximum convenience, but most situations let you get very close to both.