

Are you looking to create charming, nature-inspired treats that will wow your friends and family? The wood cookie mold recipe is your secret weapon to making delicious, visually stunning cookies that look like real tree slices.
Imagine the fun you’ll have shaping, baking, and decorating these unique cookies that bring the outdoors right to your kitchen. Keep reading, and you’ll discover easy steps and tips that will turn your baking into a creative adventure you won’t want to miss!
Credit: underatinroof.com
Ingredients Needed
Gathering the right ingredients is key to making perfect wood cookie molds. Each component plays a role in shaping the dough and giving it the right texture. This section breaks down the ingredients into dry, wet, and optional add-ins. It helps to prepare everything before starting the recipe.
Dry Ingredients
Start with all-purpose flour as the base. It gives structure to the dough. Add cornstarch for smoothness and better mold release. Baking powder helps the dough rise slightly and stay soft. Salt enhances flavor and balances sweetness.
Wet Ingredients
Use water or milk to bring the dough together. Milk adds a bit of richness. Vegetable oil or melted butter keeps the dough soft and flexible. Vanilla extract adds a mild, sweet aroma that complements the dough.
Optional Add-ins
Consider cinnamon or nutmeg for a warm, spicy touch. Food coloring can help create colorful wood cookie molds. Small seeds or nuts add texture and a natural look. These extras make each cookie unique and fun.

Credit: www.alewyfe.com
Preparing The Dough
Preparing the dough is the first step in making wood cookie molds. The dough must be soft enough to press into the mold but firm enough to hold shape. This balance makes the cookie look like a real wood slice. Careful mixing and checking the dough’s texture helps achieve the perfect result.
Mixing Techniques
Start by combining dry ingredients like flour and salt in a bowl. Stir them well to spread everything evenly. Slowly add wet ingredients such as water and oil. Use your hands or a spoon to mix until the dough starts to form. Avoid adding too much water at once. Mix gently to keep the dough smooth and soft.
Achieving The Right Consistency
The dough should not stick to your fingers. It must feel slightly firm but still pliable. If too dry, add a few drops of water. If too wet, sprinkle a little flour. Knead the dough for a few minutes. This helps the dough become smooth and elastic. Proper consistency ensures clean and detailed wood cookie molds.
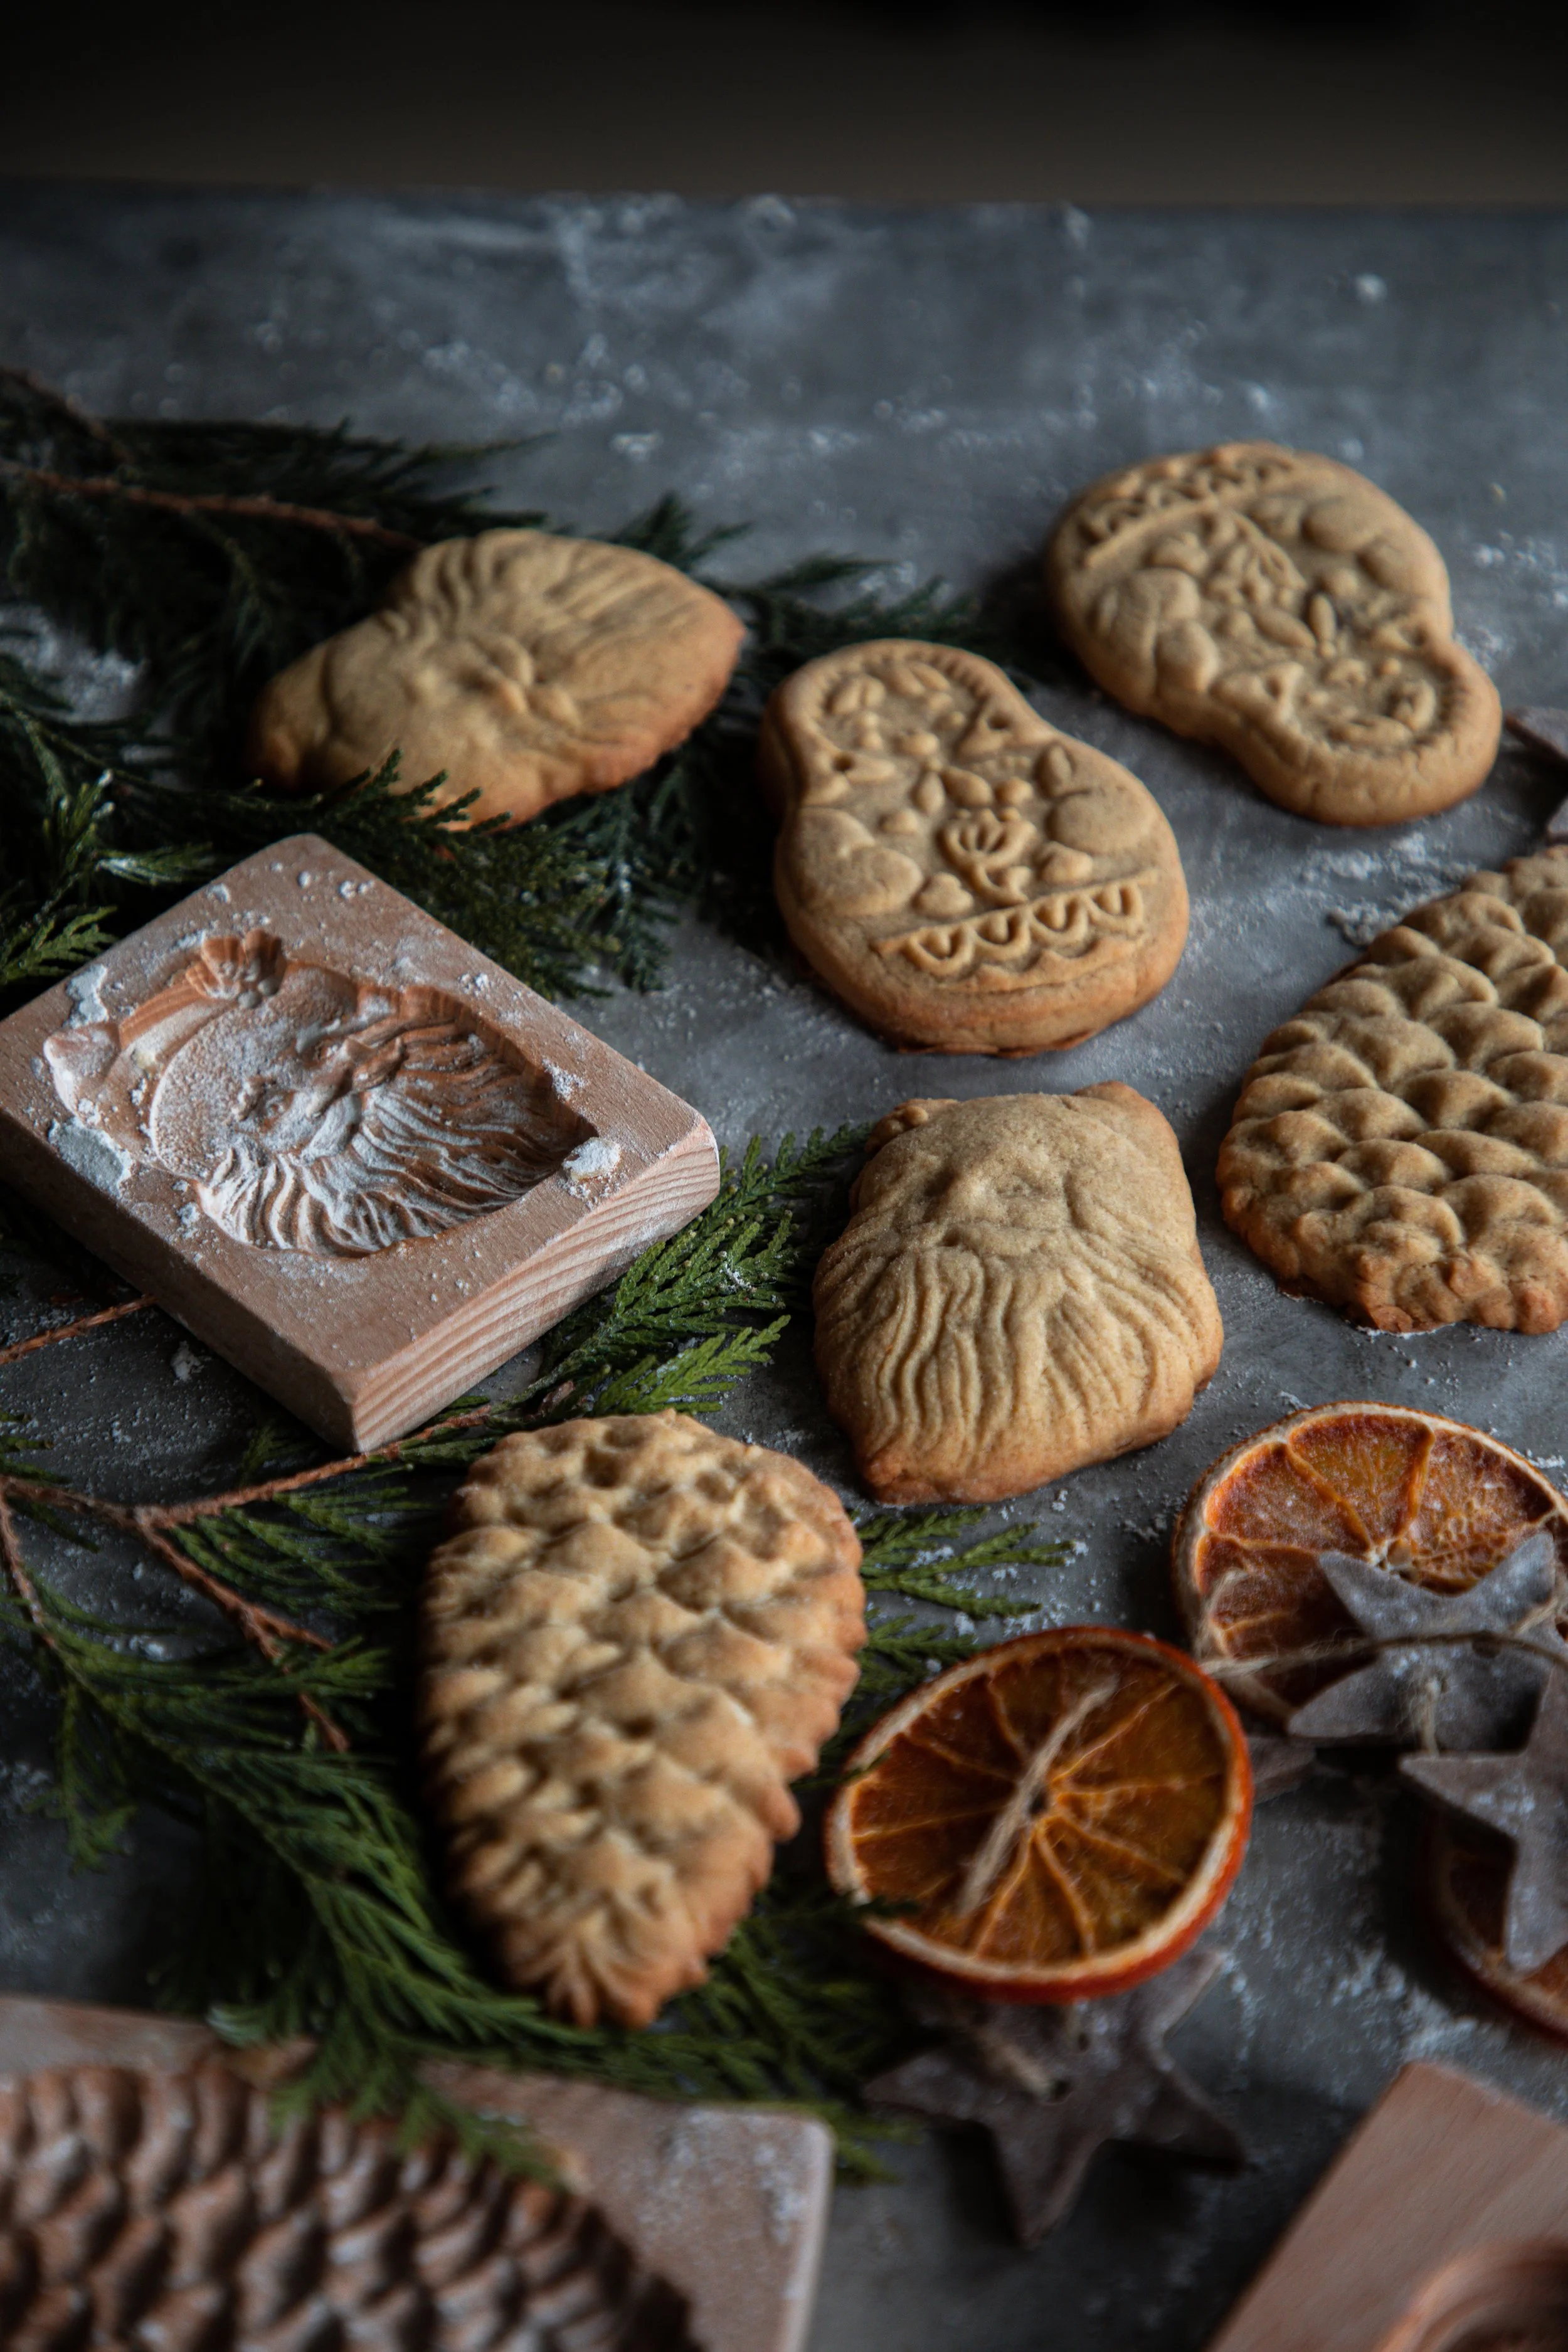
Shaping Cookies With Wood Cookie Mold
Shaping cookies with a wood cookie mold creates beautiful, unique treats. The mold gives cookies clear, sharp shapes that look great. It also makes the process faster and more fun. Using the right mold and technique helps achieve perfect results every time.
Wood molds come in many designs and sizes. Choosing the right one affects the cookie’s final look and texture. Proper pressing and cutting help keep the dough from sticking or tearing. This section explains how to pick the best mold and use it well.
Choosing The Right Mold
Select a mold that fits your cookie dough type. Some molds work better with soft dough, others with firm dough. Check the mold’s size to match your cookie size preference. Also, consider the design detail. Simple patterns release dough easier than complex ones.
Make sure the mold is smooth and free from cracks. Rough edges can stick to dough and break shapes. A well-made mold gives clean cuts and lasting use. Wood molds with a smooth finish and tight grain work best.
Pressing And Cutting Tips
Lightly flour the mold before pressing to prevent sticking. Press the mold firmly but not too hard. Too much pressure can flatten the dough or cause cracks. Press evenly to get a clear shape on every cookie.
After pressing, gently lift the mold from the dough. Use a small knife or spatula to help release edges if needed. Cut the dough around the mold shape carefully. Chill the dough before cutting for cleaner edges and less spreading in the oven.
Baking Tips
Baking wood cookie molds requires care and attention. Small changes in temperature and time affect results. Follow these tips to bake perfect wood cookie molds every time.
Optimal Oven Temperature
Set the oven to 350°F (175°C) for best results. This temperature cooks the molds evenly without burning. Avoid higher heat to prevent cracking or discoloration. Use an oven thermometer for accuracy.
Baking Time Guidelines
Bake the wood cookie molds for 20 to 25 minutes. Check them after 15 minutes to avoid overbaking. Baking time may vary depending on mold thickness. Thicker molds need a few extra minutes.
Cooling And Handling
Let the molds cool inside the oven with the door slightly open. This prevents sudden temperature changes that cause cracks. Handle the molds gently after baking. Use gloves if they are still warm to avoid burns.
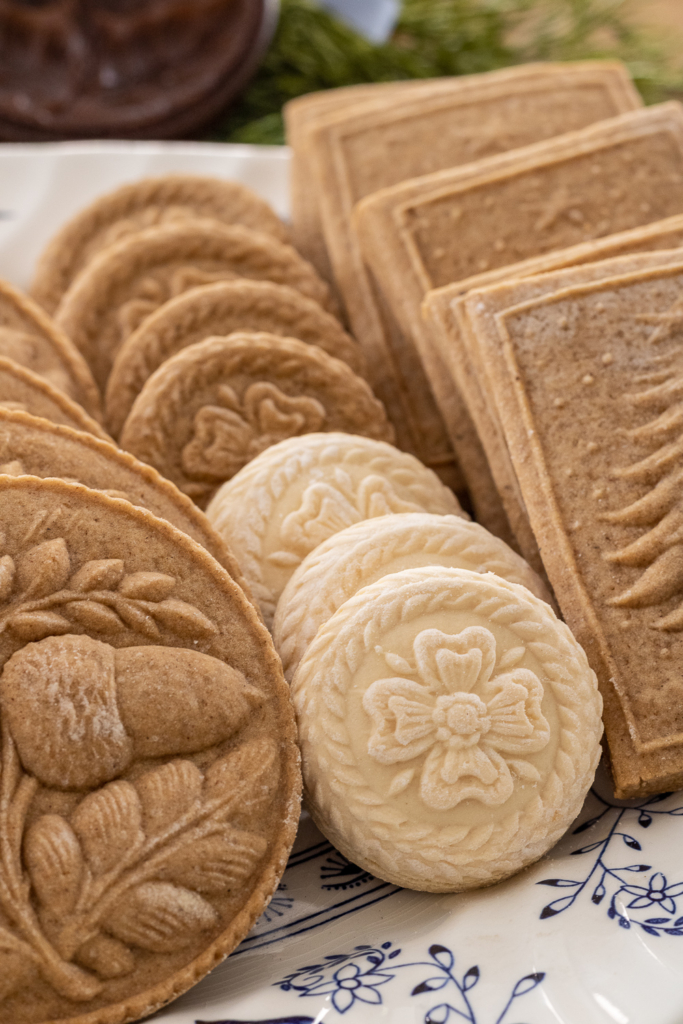
Decorating Ideas
Decorating wood cookie molds brings your creations to life. These ideas help you make each piece unique and charming. Experiment with textures, colors, and natural elements. Your decorated wood cookies will stand out beautifully.
Rustic Icing Styles
Rustic icing fits perfectly on wood cookie molds. Use simple white or cream icing for a natural look. Spread icing unevenly for a handmade feel. Add small dots or lines to mimic wood grain. Use a toothpick to create patterns gently. Avoid bright colors to keep the rustic charm.
Natural Color Enhancements
Natural colors bring warmth to wood cookie decorations. Use food coloring made from vegetables or fruits. Mix light browns, greens, and soft reds for earth tones. Brush colors lightly on the surface for a faded effect. Add edible flowers or small nuts for texture. These touches keep the look organic and fresh.
Credit: treefruitresearch.org
Storage And Shelf Life
Proper storage is key to keeping your wood cookie molds fresh and ready to use. Storing them the right way helps maintain their shape and texture. It also extends their shelf life, so you get the best results every time.
Knowing how to store these molds correctly prevents them from drying out or getting damaged. Let’s explore the best containers and tips for maintaining their freshness.
Best Containers
Choose airtight containers for storing wood cookie molds. Plastic or glass containers with tight lids work well. They keep moisture and air out, which helps preserve the molds.
Use containers that fit the molds without squashing them. Avoid stacking molds too high inside the container. It can cause them to lose shape or break.
Maintaining Freshness
Store molds in a cool, dry place away from direct sunlight. Heat and light can dry out the molds quickly. Check the molds often for any signs of mold or dryness.
Wrap each mold in wax paper or plastic wrap before placing it in the container. This extra layer keeps the molds soft and prevents sticking. Proper storage keeps your wood cookie molds fresh for weeks.
Troubleshooting Common Issues
Troubleshooting is key to perfecting your wood cookie mold recipe. Baking often brings small challenges. These problems can affect your cookie’s look and taste. Understanding common issues helps you fix them fast. Here are simple solutions for frequent problems.
Dough Too Sticky Or Dry
Sticky dough sticks to the mold and is hard to shape. Add a little flour, one teaspoon at a time. Mix gently until dough feels soft but not sticky. Dry dough cracks or falls apart. Add a small amount of water or milk. Mix until dough holds together smoothly.
Cookies Losing Shape
Cookies can spread or lose detail after baking. Chill the dough for 30 minutes before pressing it into the mold. Use a firm press but avoid overfilling the mold. Bake at the correct temperature to keep shape. Cool cookies on a flat surface quickly to keep edges sharp.
Baking Inconsistencies
Uneven baking causes some cookies to burn or stay raw. Use the middle oven rack for even heat. Check your oven temperature with a thermometer. Rotate the baking tray halfway through baking. This helps all cookies bake evenly and look great.
Frequently Asked Questions
What Ingredients Are Needed For A Wood Cookie Mold Recipe?
You need flour, sugar, butter, eggs, and vanilla extract. Some recipes also include cinnamon or nutmeg for flavor. Use natural food coloring if you want to mimic wood tones.
How Do You Shape Cookies Using A Wood Cookie Mold?
Press the cookie dough firmly into the mold to capture details. Remove excess dough and carefully release the shaped cookie. Chill before baking to retain the design.
Can I Use Different Dough Types In Wood Cookie Molds?
Yes, sugar cookie dough works best for detailed molds. You can also try gingerbread or shortbread for sturdier shapes. Avoid sticky or soft doughs that lose shape.
How Long Should I Bake Wood Cookie Mold Cookies?
Bake at 350°F (175°C) for 8-12 minutes until edges are lightly golden. Baking times vary by dough thickness and oven type. Watch closely to prevent overbaking.
Conclusion
Making wood cookie molds at home is fun and simple. You only need a few tools and some patience. Each mold you create can bring a unique touch to your cooking or crafts. Try different shapes and sizes to see what works best.
Enjoy the process and share your creations with friends or family. This recipe offers a great way to add creativity to your kitchen projects. Keep practicing, and your molds will look even better over time. Give it a try and have fun!