
Making flavored cooking oils at home is one of the simplest and most rewarding ways to elevate everyday meals while staying healthy and in control of what goes into our food. Whether we’re looking to spice up a stir-fry, drizzle something savory over roasted vegetables, or prepare a beautiful, homemade gift, infused oils deliver rich flavor and versatility with just a few ingredients.
For health-conscious home cooks and busy professionals alike, flavored oils offer a clever way to cut back on heavy sauces while still adding bold taste. Plus, they’re incredibly easy to make and customize. Want something spicy for taco night? Try chili-infused oil. Craving a Mediterranean vibe for your salad? Garlic and rosemary oil can do wonders.
In this guide, we’ll walk through everything we need to know—from choosing the right base oil and flavor pairings to safe storage and fun recipe ideas. Whether we’re new to DIY cooking oils or looking to perfect our technique, this comprehensive guide will help us master the art of making delicious, safe, and long-lasting infused oils right in our own kitchen.
Contents
- 1 Understanding Flavored Cooking Oils
- 2 Choosing the Right Oil for Infusion
- 3 How to Make Flavored Cooking Oils at Home: Step-by-Step Guide
- 4 Safety Tips for Homemade Flavored Oils
- 5 Storing and Preserving Your Infused Oils
- 6 How to Use Flavored Cooking Oils
- 7 Comparing Store-Bought vs. Homemade Infused Oils
- 8 Related Products and Tools for Oil Infusion
- 9 FAQs About Making Flavored Oils at Home
- 10 Conclusion + CTA: Make Your Own Signature Oil Today!
Understanding Flavored Cooking Oils
What Are Infused or Flavored Oils?
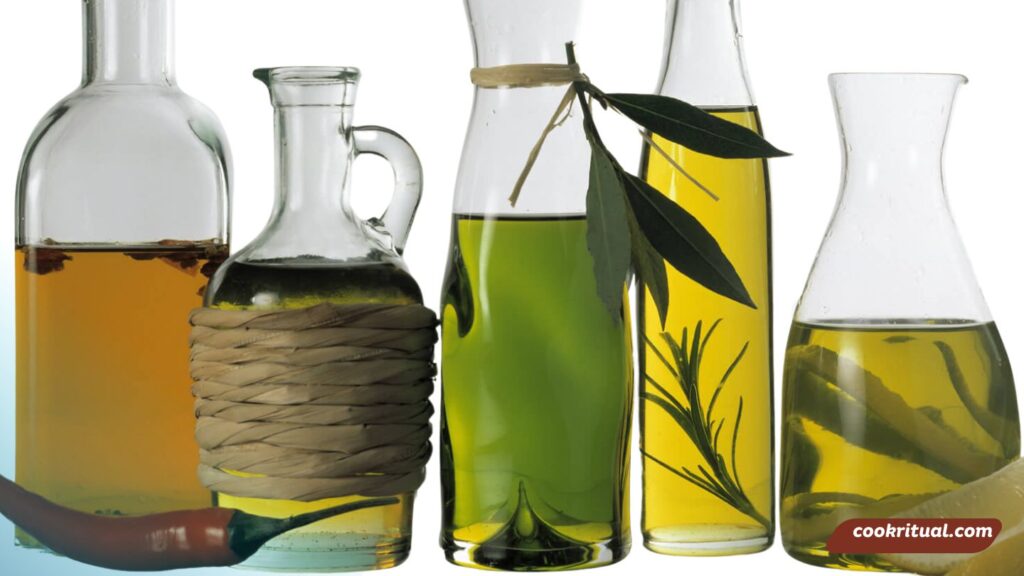
Flavored cooking oils, also called infused oils, are oils blended with herbs, spices, fruits, or vegetables to boost their taste. These oils are perfect for adding quick flavor to any dish without needing extra sauces or seasonings.
The infusion process means we steep ingredients like garlic, chili, rosemary, or lemon peel in a neutral or mild oil to extract their flavor. Over time, the oil takes on the taste, scent, and even color of what we put in it.
It’s important to know that infused oils are different from essential oils. Essential oils are highly concentrated plant extracts, not safe for cooking. Flavored oils, on the other hand, are made with edible ingredients and safe oils like olive or sunflower oil. The USDA recommends proper storage and handling when working with oil-based products to prevent spoilage.
Benefits of DIY Flavored Oils
Why make our own instead of buying them? There are a few solid reasons:
- We control what goes in—no preservatives, no hidden additives.
- It’s cheaper than most store-bought gourmet oils.
- We get to choose the flavors we love the most.
- They make great gifts—just pour into a pretty bottle and add a label.
- Custom oils support healthy eating by cutting the need for heavy sauces.
By making infused oils at home, we can stay creative and healthy at the same time.
Choosing the Right Oil for Infusion
Best Oils for Infusing Flavors
The oil we use matters a lot. It affects both the taste and shelf life of the final product. Here are some of the most popular oils for infusing flavors:
| Oil Type | Flavor Profile | Best For |
| Olive Oil | Smooth, fruity, slightly peppery | Garlic, rosemary, lemon, oregano |
| Grapeseed Oil | Mild, neutral | Chili, citrus, basil |
| Avocado Oil | Buttery, rich | Cilantro, lime, cumin |
| Sunflower Oil | Light, neutral | Spicy blends, ginger, turmeric |
We should avoid oils with strong natural flavors unless we want them to compete with our added ingredients.
Factors to Consider When Selecting a Base Oil
When picking an oil, think about these key points:
- Smoke point – Oils with higher smoke points like avocado oil work better if we plan to cook with them.
- Shelf life – Some oils last longer than others. Olive oil can go rancid faster, so it’s best used for short-term infusions.
- Flavor balance – Mild oils let herbs and spices shine, while stronger oils like extra virgin olive oil add their own character.
A Harvard Health guide can help us understand different oil types and their health impacts.
How to Make Flavored Cooking Oils at Home: Step-by-Step Guide
Tools & Supplies You’ll Need
Before we begin, let’s gather our basic tools:
- Clean, airtight glass bottles (dark ones are best)
- Small funnel
- Saucepan (for heat infusions)
- Fine mesh strainer or cheesecloth
- Fresh or dried herbs, spices, citrus zest, or garlic
- Labels and marker (optional, but helpful)
We also need to wash and dry all ingredients thoroughly to prevent bacteria growth. Any leftover water can spoil the oil.
Basic Techniques for Infusing Oil
There are two main ways to infuse oil: cold infusion and heat infusion. The method we choose depends on the ingredients and how fast we want results.
Cold Infusion Method (for delicate herbs)
- Add dried herbs or spices to a clean bottle.
- Fill with oil, leaving about 1 inch of space at the top.
- Seal tightly and store in a cool, dark place for 1 to 2 weeks.
- Shake gently every day to help the flavors mix.
- Once infused, strain and re-bottle using a clean, sterilized bottle.
Cold infusion is perfect for basil, lemon zest, or dried oregano.
Heat Infusion Method (for strong flavors)
- Combine oil and ingredients in a saucepan.
- Heat gently over low heat (no more than 180°F) for 5–10 minutes.
- Let it cool completely.
- Strain into a clean bottle using cheesecloth or a fine strainer.
This method works well for garlic, chili flakes, peppercorns, and tougher herbs like rosemary.
By following these easy steps and using clean tools, we can create delicious oils safely and quickly.
Safety Tips for Homemade Flavored Oils
How to Prevent Botulism in Infused Oils
Botulism is a rare but serious illness caused by toxins made by Clostridium botulinum bacteria. It can grow in low-acid, oil-rich settings—like homemade flavored oils—especially if garlic or fresh herbs are added and not handled right.
To stay safe, here’s what we need to do:
- Use dried ingredients when possible. Fresh herbs or garlic contain moisture, which can promote bacteria growth.
- Keep oils in the fridge. This slows bacterial activity and helps oils stay fresh longer.
- Acidify ingredients when using fresh ones. For example, soak garlic in vinegar before adding it to oil. The University of Idaho Extension explains how to acidify ingredients safely.
- Use within 1 to 2 weeks if refrigerated, or freeze in small amounts for longer use.
These steps help us enjoy our flavored oils without risking foodborne illness.
Proper Storage and Shelf Life
Once our oil is flavored, we need to store it the right way. This keeps the oil fresh and safe to use.
Follow these tips:
- Use dark glass bottles to protect oil from light.
- Label the bottle with the date it was made.
- Store in the fridge to slow spoilage.
- Use a clean, dry spoon when scooping oil out to avoid adding moisture.
If the oil smells bad, looks cloudy, or has bubbles, throw it out. It’s better to be safe than sorry.
Storing and Preserving Your Infused Oils
Best Practices for Storage
Storing oil correctly is just as important as making it. Even the best oil can go bad if it sits too long in heat or light.
Here’s how we keep it fresh:
- Keep it cool. Fridge or freezer storage is best.
- Use dark, airtight bottles to block out light and air.
- Store small amounts and use them within 2–4 weeks.
- Keep bottles dry. Water invites bacteria and mold.
Some oils will solidify in the fridge—that’s okay! Just let them sit at room temp for 10–15 minutes before using.
How to Sterilize Bottles for Infused Oils
Clean bottles help stop bacteria before it starts. It’s an easy but key step we should never skip.
Here’s how to do it:
- Wash bottles in hot, soapy water. Rinse well.
- Place in a pot of boiling water for 10 minutes.
- Remove with clean tongs and place upside-down on a clean towel to dry.
- Only fill bottles once they’re completely dry.
Want more details? The National Center for Home Food Preservation offers trusted guidelines for sterilizing jars and bottles.
How to Use Flavored Cooking Oils
Everyday Culinary Uses
Infused oils can make meals taste like restaurant dishes—fast. We just drizzle a little, and boom—instant flavor.
Try these easy uses:
- Drizzle on roasted veggies like carrots or sweet potatoes.
- Toss with pasta or grains like quinoa or couscous.
- Brush on bread or pizza crusts before baking.
- Mix into salad dressings for extra punch.
- Dip crusty bread into garlic or rosemary oil.
Flavored oils help us cut back on salt, sauces, or heavy dressings. They’re great for healthy eating and fast meals.
Tips for Cooking with Infused Oils
Not all oils can take the heat. Some are better for finishing or low-heat cooking.
Keep in mind:
- Avoid high heat with olive oil or delicate herbs—they can burn.
- Use neutral oils like grapeseed for stir-fries or sautéing.
- Add oil at the end when grilling or roasting to protect flavor.
For more about choosing oils for cooking, Mayo Clinic has a handy oil comparison guide.
Comparing Store-Bought vs. Homemade Infused Oils
Cost Comparison and Value
Buying gourmet infused oils at the store can be pricey—sometimes $10–$25 per bottle. But making them at home is much cheaper. Here’s how they compare:
| Feature | Store-Bought | Homemade |
| Cost | $10–$25 per 8 oz bottle | Under $5 to make the same at home |
| Customization | Limited to preset flavors | Choose any herb, spice, or combo |
| Freshness | May sit on shelves for months | Made fresh when we need it |
| Additives | May contain preservatives | Fully natural with no hidden extras |
| Shelf life | Longer due to preservatives | Shorter, but safer when refrigerated |
By making oil ourselves, we save money, get more flavor, and avoid the extras we don’t want.
Flavor Quality and Ingredient Control
Homemade oils taste better because we pick every ingredient. The herbs are fresh, the oil is clean, and we can balance flavors the way we like.
Plus, we avoid cheap filler oils, added salt, and strange chemicals. If we care about quality and clean eating, homemade is the winner. According to Cleveland Clinic, simple, whole ingredients always support better health.
Related Products and Tools for Oil Infusion
Recommended Bottles, Funnels, and Strainers
A few simple tools can make the process easy and mess-free. Here are some worth investing in:
- Dark glass bottles with airtight caps – Keep oil fresh and block light.
- Stainless steel funnel – Helps pour oil neatly without waste.
- Fine mesh strainer or cheesecloth – Strains out herbs and spices cleanly.
- Glass measuring cup – Useful for heating oil gently in the microwave.
- Food-safe labels – Great for naming oils and adding dates.
Look for BPA-free and dishwasher-safe options when buying supplies. Online stores like Williams Sonoma or Sur La Table often have high-quality options.
DIY Kits and Starter Sets
For beginners, oil infusion kits are a great place to start. These usually include:
- A bottle or two
- A funnel
- Some pre-dried herbs or spices
- Instructions or recipe cards
They make excellent gifts and save time on shopping for supplies. Try to pick kits with natural ingredients and reusable tools.
FAQs About Making Flavored Oils at Home
Can I Use Fresh Garlic or Herbs?
Yes, but it must be done safely. Fresh ingredients hold water, which can lead to bacteria growth if not handled right. Always refrigerate oils made with fresh garlic or herbs and use them within one week. Or better, use dried versions to be safer.
How Long Do Homemade Flavored Oils Last?
If made with dried ingredients and clean tools, they can last 1–2 months in the fridge. Oils made with fresh ingredients should be used within 7–10 days and always kept cold.
Can I Reuse Herbs for a Second Batch?
It’s best not to. The herbs lose flavor after one use, and bacteria risk goes up each time. For strong flavor and food safety, use a fresh batch of herbs each time.
Why Did My Oil Turn Cloudy or Smell Off?
Cloudiness or odd smells may mean the oil has spoiled. It might be due to moisture, poor storage, or old ingredients. When in doubt, throw it out. Better safe than sorry.
Conclusion + CTA: Make Your Own Signature Oil Today!
Flavored cooking oils are one of the easiest ways to turn everyday meals into something special. With just a few ingredients, we can bring bold, fresh taste to salads, pastas, grilled veggies, and more—while staying in control of what goes into our food.
We’ve learned how to:
- Choose the best base oils
- Pick safe, flavorful herbs and spices
- Infuse with care using hot or cold methods
- Store oils the right way for safety and freshness
- Use them creatively in everyday meals
Whether we’re prepping for the week or making DIY gifts for food lovers, flavored oils add real value to a healthy kitchen. And unlike store-bought versions, homemade oils let us skip the preservatives and cut costs—without cutting flavor.