

Imagine biting into a warm, crusty loaf of bread with a smoky flavor that only a wood fire can create. You don’t just want any bread—you want bread that feels homemade, rustic, and full of character.
This wood fired bread recipe will show you exactly how to turn simple ingredients into something extraordinary. Whether you’re a beginner or have baked before, this guide will help you master the art of baking bread in a wood-fired oven.
Ready to fill your kitchen with the irresistible aroma of fresh bread? Let’s get started!
Choosing The Right Wood
Choosing the right wood is key for baking bread in a wood-fired oven. The wood affects the heat and flavor of your bread. Good wood burns longer and cleaner. Bad wood creates smoke and bad taste. Learn which woods work best and how to store them properly.
Best Hardwood Types
Hardwoods burn hotter and longer than softwoods. Oak is a popular choice. It gives steady heat and good flavor. Maple also works well. It burns clean and adds a mild sweetness. Hickory is strong and gives a smoky taste. Applewood is great for a fruity aroma. These woods create the best fire for baking bread.
Avoiding Resinous Woods
Resinous woods like pine or cedar are not good. They burn too fast and make smoke. The resin creates unpleasant flavors and soot. This can ruin the taste of your bread. Always skip woods with sticky sap or strong smell. Choose dry, clean hardwoods to avoid bad smoke.
Seasoning And Storage Tips
Wood must be dry before burning. Fresh wood has too much water. It burns poorly and makes smoke. Season wood by storing it in a dry place for 6 to 12 months. Stack wood off the ground and cover the top. Air needs to flow around it. Properly stored wood gives a hot, clean fire for baking.
Credit: www.fornobravo.com
Preparing The Dough
Preparing the dough is the first step to making delicious wood-fired bread. It sets the base for great texture and flavor. The dough must be mixed carefully to get the best results. Each ingredient plays a role in shaping the bread’s final taste and crust. Understanding how to select flour, manage hydration, and knead the dough helps create a perfect loaf.
Selecting Flour Varieties
Choosing the right flour is key. Bread flour with high protein works well. It gives the dough strength and chewiness. All-purpose flour can be used but may result in softer bread. Whole wheat flour adds a nutty flavor and extra nutrients. Mixing different flours can improve texture and taste. Experiment with blends to find your favorite.
Hydration Levels For Crispy Crust
Water amount affects dough texture and crust crispiness. Higher hydration creates a lighter, airier crumb. It also helps form a crispy crust when baked in a wood-fired oven. Aim for 65% to 75% hydration, depending on flour type. Add water slowly to control dough stickiness. Adjust hydration to match your baking environment and flour absorbency.
Kneading Techniques
Kneading develops gluten, which gives dough elasticity. Use the stretch and fold method for gentle kneading. It strengthens dough without tearing it. Knead for 8 to 10 minutes for a smooth, elastic texture. Avoid over-kneading, which makes bread tough. Let the dough rest after kneading for better fermentation and rise.
Fermentation And Proofing
Fermentation and proofing are key steps in making wood fired bread. These processes help develop flavor and texture. They allow the dough to rise and become airy. Proper fermentation and proofing give bread its soft inside and crisp crust.
Ideal Temperature And Timing
Keep dough at 75-80°F (24-27°C) for best results. This temperature helps yeast work well. Ferment dough for 1 to 2 hours until it doubles in size. Overproofing makes dough weak and hard to shape.
Using A Proofing Basket
A proofing basket holds dough shape during the last rise. It supports soft dough and creates nice patterns on crust. Lightly flour the basket to stop dough from sticking. Use a basket to keep dough round and even.
Signs Of Proper Fermentation
Dough looks puffy and soft but not too loose. It springs back slowly when gently pressed. The surface may have small bubbles or cracks. These signs mean the dough is ready for baking in the wood fired oven.

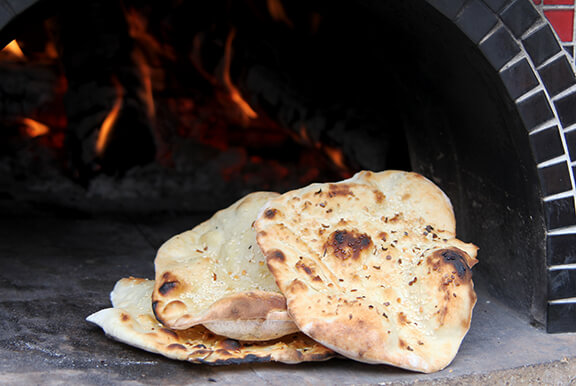
Credit: breadstoneovens.com
Firing The Oven
Firing the oven is a key step in making wood fired bread. It sets the right heat for baking. You need patience and care to get it right.
Each part of this process affects the bread’s crust and texture. Let’s break down how to prepare your oven for perfect baking.
Building The Fire
Start with dry, seasoned wood. Small pieces catch fire fast. Stack them in the oven’s center. Light the wood gently. Let the fire grow slowly. Add larger logs once the flames are steady. Avoid smothering the fire with too much wood at once. Let the fire burn strong and bright.
Achieving Optimal Oven Temperature
Heat the oven until the walls glow red. This means the oven is very hot. Use an infrared thermometer to check. Aim for around 700°F (370°C) at first. The floor should also be hot enough to cook bread quickly. The right temperature helps the bread rise and form a crust.
Maintaining Heat During Baking
Push the fire to the oven’s back or side. Keep some embers inside for steady heat. Close the oven door to trap warmth. Check temperature with a hand test or thermometer. Add small wood pieces if heat drops. Keep the oven hot but avoid strong flames near bread.
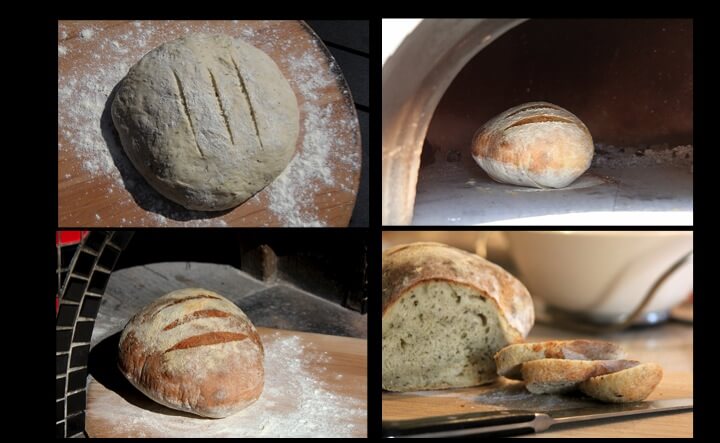
Shaping And Scoring
Shaping and scoring are key steps in making wood fired bread. They give the bread its form and help it bake evenly. Proper shaping controls the dough’s rise. Scoring allows steam to escape and creates a beautiful crust. Both steps affect the final texture and look.
Forming The Loaves
Start by gently stretching the dough into a round or oval shape. Use your hands, not a rolling pin. Tighten the surface by folding edges underneath. This creates tension for a better rise. Let the dough rest briefly to relax. Shaped dough holds its shape well during baking.
Effective Scoring Patterns
Use a sharp blade or lame to score the dough. Make quick, confident cuts about 1/4 inch deep. Patterns can be simple straight lines or decorative slashes. Scoring controls how the bread expands in the oven. Avoid deep or uneven cuts to prevent deflation.
Preventing Dough Sticking
Dust your work surface and hands with flour before shaping. Use a bench scraper to lift dough gently. Avoid adding too much flour, which can dry the dough. Parchment paper helps transfer dough easily to the oven. Keeping dough slightly moist prevents sticking and tearing.
Credit: www.fornobravo.com
Baking Techniques
Baking bread in a wood-fired oven offers unique challenges and rewards. The techniques you use directly affect the bread’s texture and flavor. Understanding key baking methods helps create perfect loaves every time.
Controlling heat, moisture, and timing are essential for wood-fired bread. These factors influence the crust, crumb, and overall bake quality.
Using Steam For Crust Development
Steam is vital for a crispy, golden crust. It keeps the dough surface moist at the start of baking. This moisture lets the bread expand fully before the crust hardens.
Add steam by placing a pan of water inside the oven or spraying water on oven walls. Steam slows crust formation and helps create a shiny finish. Without steam, the crust may become thick and dull.
Monitoring Bake Time
Wood-fired ovens can have uneven heat. Check the bread often to avoid burning. Bake times vary based on oven temperature and loaf size.
Use visual cues like color and sound. The crust should be deep golden brown. Tap the loaf’s bottom; it should sound hollow when done.
Adjusting For Different Loaf Sizes
Small loaves bake faster than large ones. Adjust bake time and oven placement accordingly. Place bigger loaves closer to hot spots.
Turn loaves during baking for even heat exposure. Watch small loaves carefully to prevent overbaking. Proper adjustments ensure consistent results with all sizes.
Cooling And Storage
Cooling and storing wood fired bread correctly keeps its flavor and texture fresh. Bread continues to cook inside after it leaves the oven. Cooling lets steam escape and crust harden. Proper storage stops bread from drying out or becoming moldy.
Proper Cooling Methods
Place the bread on a wire rack. This lets air flow around the loaf. Avoid cooling bread on solid surfaces. It traps moisture and makes the crust soft. Let the bread cool completely before storing. Warm bread inside plastic creates condensation. That leads to soggy bread and mold growth.
Maintaining Crust Crispiness
Keep the crust crisp by storing bread in paper. Paper allows the crust to breathe. Avoid plastic bags for fresh bread. They trap moisture and soften the crust. For longer crispiness, reheat bread in an oven for a few minutes. This refreshes the crust and improves texture.
Best Storage Practices
Store bread at room temperature for up to three days. Use a bread box or a paper bag. For longer storage, freeze bread in a plastic bag. Slice before freezing for easy use. Thaw bread at room temperature or toast slices directly from the freezer. This keeps bread fresh and tasty.
Troubleshooting Common Issues
Troubles with wood fired bread happen even to the best bakers. Understanding common problems helps fix them fast. Bread texture, crust color, and oven heat are key factors. This section covers simple tips to solve usual baking issues.
Fixing Dense Or Underbaked Bread
Dense bread often means the dough did not rise enough. Check yeast freshness and proof time. Use warm water to activate yeast properly. Underbaked bread feels heavy inside. Bake longer at a steady temperature. Insert a toothpick to test doneness; it should come out clean.
Avoiding Burnt Crust
Burnt crust happens if the oven is too hot or bread is too close to flames. Move the bread farther from direct heat. Use a baking stone or an oven rack to shield the bread. Keep an eye on the crust color during baking. Cover the bread with foil if it browns too fast.
Dealing With Oven Temperature Fluctuations
Wood fired ovens can have uneven heat. Use an infrared thermometer to check hot spots. Rotate the bread regularly for even baking. Control the fire size by adding small wood pieces. Wait until the oven cools to the right temperature before baking. Consistent heat gives better bread results.
Enhancing Flavor And Texture
Enhancing the flavor and texture of wood fired bread brings a special touch to every bite. The heat from the wood fire creates a unique crust and crumb. Small changes in ingredients and techniques can make a big difference. Try these tips to improve your bread’s taste and feel.
Adding Herbs And Seeds
Herbs and seeds add extra flavor and crunch to your bread. Rosemary, thyme, or oregano give a fresh, earthy taste. Seeds like sesame, sunflower, or flax add nuttiness and texture. Mix them into the dough or sprinkle on top before baking. These additions create a more interesting and tasty bread.
Using Sourdough Starter
Sourdough starter gives bread a rich, tangy flavor. It also improves texture, making the crumb soft and chewy. The natural fermentation helps develop complex tastes. Using a starter takes longer but offers better results. Your wood fired bread will have a deep, wholesome character.
Experimenting With Hydration
Hydration means the amount of water in the dough. More water makes the bread lighter and airier. Less water produces a denser, chewier texture. Try different hydration levels to find your favorite. Adjusting water content changes the crumb and crust. It’s a simple way to customize your bread’s feel.
Frequently Asked Questions
What Ingredients Are Needed For Wood Fired Bread?
You need flour, water, yeast, salt, and optionally sugar or oil. Use fresh, quality ingredients for best results. The wood fire adds unique flavor and crust texture.
How Do You Maintain Temperature In A Wood Fired Oven?
Keep the fire burning steadily to reach 450-500°F (230-260°C). Use dry hardwood for consistent heat. Let embers spread evenly before baking bread.
How Long Does Wood Fired Bread Take To Bake?
Typically, wood fired bread bakes in 20 to 30 minutes. Baking time varies by oven heat and loaf size. Check for a golden crust and hollow sound when tapped.
Can I Use Regular Yeast For Wood Fired Bread?
Yes, regular active dry or instant yeast works well. Ensure proper fermentation time for good rise and texture. Adjust water temperature based on oven heat.
Conclusion
Baking wood fired bread brings a warm, smoky flavor to your table. The process is simple but rewarding. Each loaf shows your care and patience. Sharing fresh bread feels special and comforting. Try this recipe to enjoy homemade bread’s true taste.
Your kitchen will fill with inviting smells. Give it a go and taste the difference. Bread baked this way stands out from store-bought types. The crackling crust and soft inside delight everyone. Enjoy the baking journey and the tasty results.