

Imagine pulling a warm, crusty loaf of bread straight from a wood fired oven, its aroma filling your kitchen and making your mouth water. You can achieve this delicious experience right at home with the right recipe and a bit of practice.
This wood fired oven bread recipe is designed just for you—whether you’re a beginner or looking to perfect your baking skills. Get ready to create bread with a golden crust and soft, flavorful inside that will impress your family and friends.
Keep reading, and you’ll discover simple steps and tips that turn your baking into a truly rewarding experience.
Choosing The Right Flour
Choosing the right flour is key to making delicious wood fired oven bread. Flour affects the bread’s taste, texture, and rise. Each type of flour has unique qualities that suit different bread styles. Understanding these helps you bake bread that is perfect every time.
Types Of Flour For Bread
All-purpose flour is common and easy to find. It has moderate protein, good for soft bread. Bread flour has higher protein, creating strong gluten. This leads to chewy, airy bread with good rise. Whole wheat flour includes the whole grain, adding fiber and flavor. Rye flour gives a dense texture and a slightly sour taste. Choosing flour depends on the bread you want to bake.
Benefits Of Whole Grain Flour
Whole grain flour keeps the bran and germ from the grain. This adds fiber, vitamins, and minerals to your bread. It also gives a nutty flavor and darker color. Bread made with whole grain flour feels more filling. It is healthier and supports good digestion. Using whole grain flour makes your bread more natural and nutritious.
Blending Flours For Texture
Mixing different flours can improve your bread’s texture. Combining bread flour with whole wheat softens the density. This creates a light but healthy loaf. Adding rye or spelt flour changes the flavor and crumb. Start with small amounts and adjust to taste. Blending lets you customize bread for softness, chewiness, or flavor depth.

Credit: breadstoneovens.com
Preparing The Dough
Preparing the dough is the first and most important step in baking bread in a wood fired oven. This process sets the base for the bread’s texture and flavor. Good dough preparation helps the bread rise well and develop a crispy crust.
Each part of making the dough needs care and attention. From measuring ingredients to kneading, every step affects the final bread quality. Let’s explore the key steps for preparing perfect dough.
Measuring Ingredients Accurately
Use a digital scale for exact measurements. Even small differences can change dough texture. Measure flour and water precisely. Use fresh yeast for best results. Salt and sugar should be measured carefully to balance flavor.
Mixing Techniques
Mix ingredients until they just come together. Avoid overmixing; it can make dough tough. Use a wooden spoon or your hands. Mix slowly to hydrate the flour evenly. Proper mixing helps gluten develop naturally.
Kneading Tips For Elastic Dough
Knead dough on a clean, floured surface. Use the heel of your hand to push and fold. Knead for about 10 minutes until smooth. Elastic dough springs back when pressed gently. Good kneading builds strength and traps air.
Fermentation And Proofing
Fermentation and proofing are key steps in baking bread in a wood fired oven. These processes help develop the bread’s flavor and texture. During fermentation, yeast consumes sugars and produces gas. This gas makes the dough rise and become light. Proofing is the final rise before baking. Proper fermentation and proofing ensure a soft crumb and crisp crust.
Ideal Temperature For Rising
The best temperature for dough rising is between 75°F and 85°F. Yeast works well in this warm range. Too cold slows down fermentation. Too hot can kill the yeast. Keep dough in a warm, draft-free spot. This helps the dough rise evenly and fully.
Timing For Perfect Proof
Proofing time depends on dough and room temperature. Usually, it takes 1 to 2 hours. The dough should double in size. Check by gently pressing the dough. If it springs back slowly, it is ready. Over-proofing can cause a flat loaf. Under-proofing results in dense bread.
Using A Proofing Basket
A proofing basket shapes the dough during the final rise. It supports the dough and prevents spreading. The basket also creates a beautiful pattern on the crust. Dust the basket with flour to stop sticking. Use a linen liner for soft dough. This tool helps achieve a professional look.
Credit: www.fornobravo.com
Setting Up Your Wood Fired Oven
Setting up your wood fired oven is the first step to baking delicious bread. It needs the right fire, heat, and timing. Proper setup helps the oven reach and keep the perfect baking temperature. This section explains how to build the fire, control the heat, and check the temperature.
Building And Maintaining The Fire
Start with dry, seasoned wood. Use small kindling to light the fire quickly. Add larger logs as the flames grow. Keep the fire steady by adding wood little by little. Remove ashes often. A clean oven lets the fire burn strong and steady. Watch the fire closely. Avoid letting it die out or burn too fast.
Achieving Optimal Oven Temperature
Heat the oven to about 450°F to 500°F (230°C to 260°C) for bread. This temperature bakes the crust golden and chewy. Heat the oven for at least one hour. The oven walls and floor must be hot enough to bake evenly. Spread the fire inside the oven to warm all surfaces. Let the flames die down before baking the bread.
Using A Thermometer For Accuracy
A good oven thermometer shows the exact temperature inside. Place it on the oven floor or wall. Check the temperature often while heating. Adjust the fire by adding or removing wood. Using a thermometer helps avoid underbaked or burnt bread. It ensures the oven stays at the best heat for perfect baking.
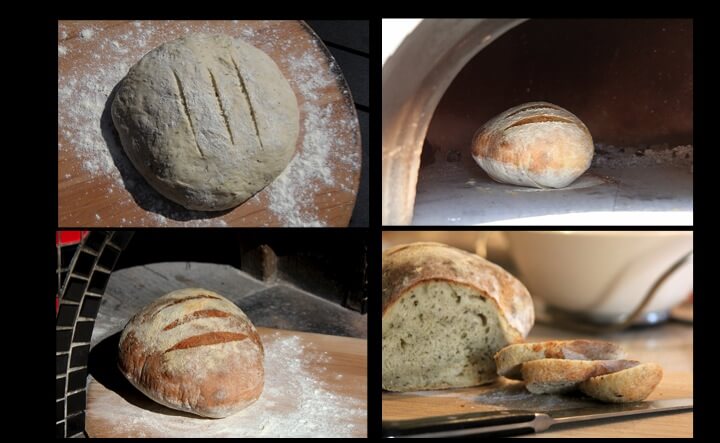
Shaping And Scoring The Loaf
Shaping and scoring the loaf are key steps in baking bread in a wood fired oven. Proper shaping gives the bread its final form and texture. Scoring helps the bread expand while baking. It also adds a beautiful design on the crust. Both steps need care and attention to get the best results.
Shaping Techniques For Rustic Bread
Rustic bread has a natural, rough look. Start by gently folding the dough to build strength. Use your hands to create a tight, round shape. Avoid pressing too hard. Let the dough rest between folds. This helps develop texture and flavor. Use a floured surface to prevent sticking. The dough should feel smooth but soft.
Scoring Patterns For Expansion
Scoring allows steam to escape during baking. It controls where the bread will crack. Simple cuts like a single slash help the loaf open nicely. Cross patterns add a classic look. Try diagonal lines for a rustic style. Score just before baking. Use quick, confident cuts. The depth should be about 1/4 inch. Scoring also adds character to your bread.
Tools For Scoring
Use a sharp blade to score the dough. A razor blade or a baker’s lame works best. A sharp tool makes clean cuts without tearing. Avoid dull knives because they drag the dough. Keep your blade clean and dry. You can also use a small, sharp knife if you don’t have a lame. Practice on dough scraps to get comfortable with scoring.
Credit: www.fornobravo.com
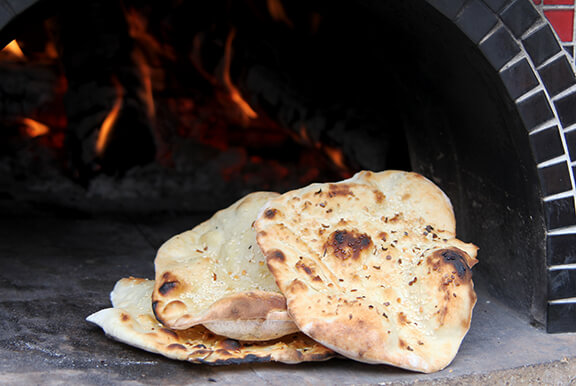
Baking Process In Wood Fired Oven
Baking bread in a wood fired oven is a special experience. The process adds unique flavors and textures. The heat from the fire cooks the bread evenly and quickly. Understanding the baking steps helps create perfect loaves every time.
Placing The Dough In The Oven
First, prepare the oven floor by clearing ashes. Use a peel to transfer the dough carefully. Place the dough away from direct flames. Position it near the oven’s hot center for best heat. Close the oven door to keep heat inside.
Managing Oven Heat During Baking
Wood fired ovens have uneven heat zones. Watch the bread closely to avoid burning. Rotate the loaf halfway through baking for even browning. Add small wood pieces to keep the fire steady. Use an oven thermometer to check the temperature.
Steam And Crust Development
Steam helps form a crisp crust on the bread. The hot oven causes water in the dough to evaporate. This moisture creates steam inside the oven chamber. A strong crust locks in the bread’s softness inside. Avoid opening the oven too often to keep steam.
Cooling And Storing Bread
Cooling and storing bread baked in a wood fired oven is important to keep its fresh taste and crunchy crust. Proper cooling stops the bread from becoming soggy. Storing it right helps keep the flavor and texture for days. Follow these simple tips to enjoy your bread longer and at its best.
Cooling Methods To Maintain Crust
After baking, let the bread cool on a wire rack. This allows air to flow around the bread. Avoid wrapping the bread while it is hot. Wrapping traps steam and softens the crust. Leave the bread at room temperature for about 1 to 2 hours. The crust will stay crisp and the inside will finish setting.
Best Storage Practices
Store your bread in a paper bag or a bread box to keep the crust crisp. Avoid plastic bags unless the bread is fully cooled. Plastic traps moisture and makes the crust soft. For longer storage, freeze the bread. Wrap it tightly in foil or freezer bags before freezing. Thaw at room temperature without unwrapping for the best texture.
Reheating Tips
Reheat bread in an oven at 350°F (175°C) for 5-10 minutes. This warms the bread and refreshes the crust. Use a toaster oven for smaller slices. Avoid microwaving as it can make bread chewy and hard. A quick reheat brings back the fresh-baked taste and texture.
Troubleshooting Common Issues
Making bread in a wood fired oven is a special experience. Sometimes, things do not go as planned. Troubles happen, but they can be fixed. Understanding common problems helps you bake better bread each time.
Avoiding Dense Or Gummy Bread
Dense bread feels heavy and gummy bread is wet inside. Too much flour or not enough water causes this. Also, not letting the dough rise enough affects texture. Use the right flour amount and add water slowly. Let the dough rise until it doubles in size.
Fixing Uneven Crust
Uneven crust means some parts are burnt and others are pale. This happens if the oven heat is not spread well. Move the bread during baking for even heat. Use a stone or baking surface to hold heat better. Check the oven temperature regularly.
Dealing With Overproofed Dough
Overproofed dough is too soft and breaks easily. It loses shape and does not rise well in the oven. Watch the dough closely during rising time. Stop proofing when the dough doubles and springs back slowly. Use cooler water to slow down proofing in hot weather.
Enhancing Flavor And Variety
Wood fired oven bread offers a rich, smoky taste unique to this baking style. Enhancing flavor and variety makes each loaf special. Small changes in ingredients create big differences in taste and texture. These ideas help you explore new flavors in your bread.
Adding Seeds And Nuts
Seeds and nuts add crunch and depth to bread. Sunflower seeds, pumpkin seeds, or sesame seeds bring a nutty flavor. Walnuts, pecans, or almonds offer a rich, earthy taste. Sprinkle seeds on top before baking for a crispy crust. Mix nuts inside dough for chewy texture. These ingredients boost nutrition and make bread more interesting.
Incorporating Herbs And Spices
Fresh or dried herbs give bread a fragrant aroma. Rosemary, thyme, and oregano are popular choices. Add herbs to dough or sprinkle on top. Spices like cinnamon or nutmeg add warmth and sweetness. Garlic or chili flakes create a spicy kick. Herbs and spices transform simple bread into a flavorful treat.
Using Sourdough Starter
Sourdough starter adds a tangy flavor and chewy texture. It improves bread’s shelf life naturally. The wild yeast in starter helps dough rise slowly. This slow fermentation deepens flavor and creates air pockets. Sourdough bread pairs well with many toppings. Using starter also connects you to traditional baking methods.
Frequently Asked Questions
What Type Of Flour Is Best For Wood Fired Oven Bread?
High-protein bread flour is ideal for wood fired oven bread. It creates strong gluten, giving bread a chewy texture and good rise. You can also mix whole wheat flour for extra flavor and nutrition.
How Do You Control Temperature In A Wood Fired Oven?
Maintain oven temperature by managing the fire size and wood type. Use hardwoods like oak for steady heat. Let the fire burn down until the oven reaches 450-500°F before baking bread.
How Long Does Wood Fired Oven Bread Take To Bake?
Wood fired oven bread usually bakes in 20-30 minutes. Baking time depends on oven temperature and loaf size. Check for a golden crust and hollow sound when tapped for doneness.
Can I Use Sourdough Starter In Wood Fired Oven Bread?
Yes, sourdough starter works well in wood fired oven bread. It adds flavor and natural leavening. Adjust fermentation time as needed, since wood fired ovens bake quickly at high heat.
Conclusion
Baking bread in a wood fired oven brings rich, smoky flavors. The crispy crust and soft inside make it special. This simple recipe helps you enjoy fresh bread at home. Practice will improve your skills and results. Share your warm, homemade bread with family and friends.
Enjoy the process and the tasty outcome. Try different doughs to find your favorite taste. Wood fired oven bread is a treat worth making often.