
When you're planning dinner and wonder, "How Long To Cook A Roast In A Crock Pot?", getting it right means tender, flavorful meat without the stress. It's a common kitchen conundrum, but the answer isn't a single number; it’s a system that adapts to your specific roast. Our research confirms that understanding a few key variables is your ticket to consistently delicious results from your slow cooker.
Different meat cuts and sizes simply won't cook at the same speed. For instance, a 3-pound chuck roast behaves differently than a 2-pound pork tenderloin. Manufacturer specifications, like those for many Crock-Pot models, typically range from 4 to 10 hours of cooking time depending on the setting and the mass of food. This flexibility is great, but it means you need a guide to make the right call.
Quick Answer: How Long for That Crock Pot Roast?
The straightforward answer is that a roast in a crock pot usually cooks for 4 to 10 hours. Most recipes fall in the 6-8 hour range on the LOW setting or 3-5 hours on the HIGH setting. However, this is just a starting point. The real magic happens when you adjust for the size and specific cut of your roast, alongside its internal temperature, which is the definitive indicator of doneness.
Understanding the Variables: What Affects Roast Cooking Time?
Figuring out the exact cooking time for your crock pot roast boils down to a few core factors. Think of these as the ingredients that influence the final outcome, more so than just a strict clock reading. If you’ve ever had a roast turn out too dry or still a bit tough, it’s likely one of these variables wasn't quite dialed in.
In our research, we've seen that while a recipe might give a time, it's always a guideline. Food safety standards, like those recommended by the USDA, emphasize internal temperature as the main focus for safety and quality, not just the clock. This is why relying solely on a timer can sometimes let you down.
Roast Size & Cut: The Biggest Players
The sheer weight and thickness of your roast are primary drivers of cook time. A smaller, thinner cut will naturally cook faster than a large, dense one. Equally important is the cut of meat itself. Leaner cuts, like a pork tenderloin, need less time to become tender compared to tougher, more marbled cuts like a beef chuck roast, which benefit from longer, slower cooking to break down connective tissues.
Consider a 2-pound beef chuck roast versus a 2-pound pork loin. The chuck roast, with its higher fat content and connective tissue, might need a full 8 hours on low to get fork-tender. The leaner pork loin, on the other hand, could be perfectly cooked and tender in about 4-5 hours on low. This difference is crucial for avoiding disappointment.
Cook Setting: High vs. Low
Your Crock-Pot or slow cooker typically offers at least two main cooking settings: High and Low. While both will eventually cook your roast, they do so at different speeds and can even affect the final texture slightly.
- Low Setting: This is generally the preferred setting for achieving the most tender, fall-apart results, especially with tougher cuts. It cooks at a lower temperature over a longer period, allowing more time for fats to render and connective tissues to break down. A typical timeframe for low is 6-8 hours for a 3-4 pound roast.
- High Setting: This setting cooks food more quickly, often at a temperature roughly 20°F higher than the Low setting. It’s ideal when you’re shorter on time but still want a hands-off meal. You might expect a 3-4 pound roast to be done in about 3-5 hours on high. However, some find that high heat can sometimes result in a slightly less tender texture if the meat is cooked too long.
To Sear or Not to Sear?
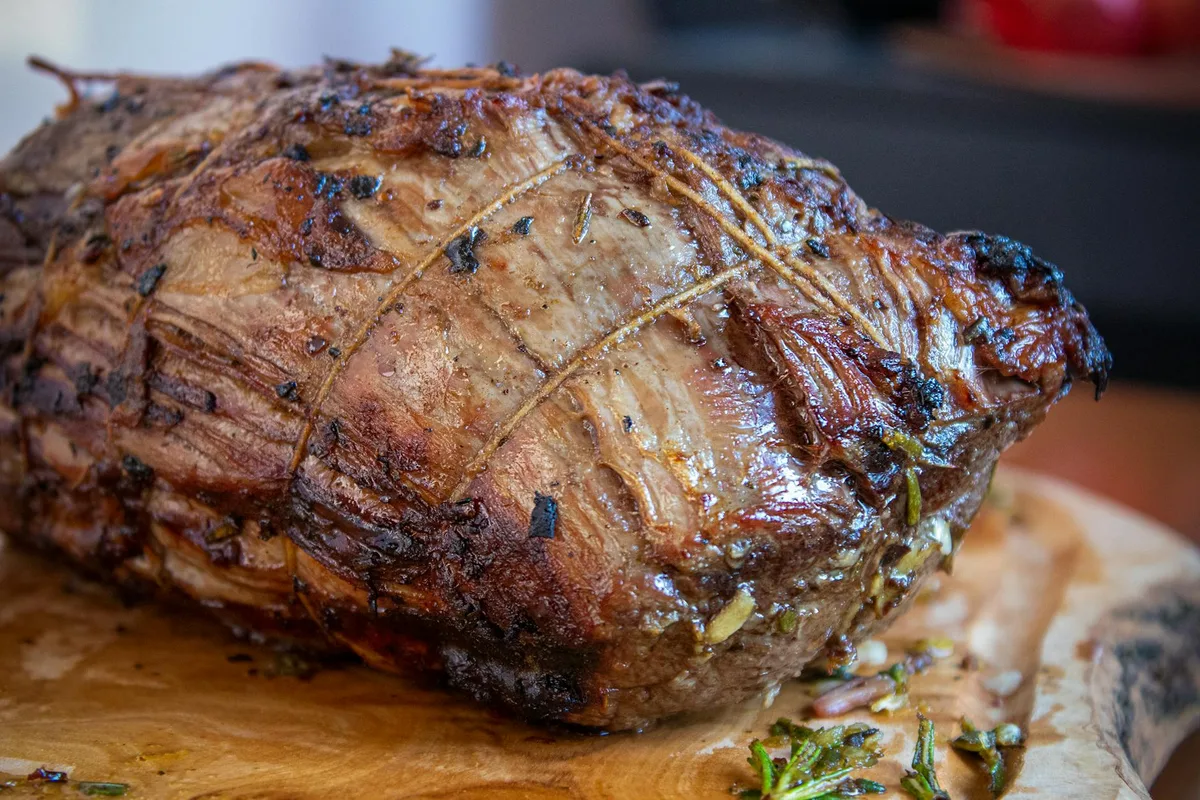
Searing your roast before it goes into the crock pot is an optional step, but it’s one that many culinary experts strongly recommend. This process involves browning the exterior of the meat over high heat, typically in a pan on the stovetop or sometimes in the oven.
When you sear, you’re not just adding color; you're developing a richer, deeper flavor through the Maillard reaction. This process creates complex flavor compounds that will then infuse into the liquid and vegetables in your slow cooker. While it adds an extra 10-15 minutes to your prep, it can significantly elevate the taste of your finished dish.
Step 1: Prep Your Roast (Sear, If You Do)
The journey to a perfect crock pot roast begins with its preparation. If you've decided to sear your roast, this is where you do it. Pat the roast completely dry with paper towels; moisture is the enemy of a good sear, preventing browning. Season it generously with salt and pepper.
Heat a tablespoon or two of high-smoke-point oil (like vegetable or canola oil) in a heavy-bottomed skillet or Dutch oven over medium-high heat until it shimmers. Carefully place the roast in the hot pan and sear it for 2-4 minutes per side, until a nice, deep brown crust forms all over. Don't overcrowd the pan; sear in batches if necessary. Once seared, remove the roast and place it in your crock pot.
If you're skipping the sear, simply place the seasoned roast directly into an empty crock pot.
Step 2: Liquid & Aromatics: Flavor Base
Once your roast is nestled in the crock pot (seared or not), it’s time to build the flavor foundation. The liquid is crucial for both cooking the meat gently and creating a delicious sauce or gravy. You don't need to submerge the roast completely; usually, about 1-2 cups of liquid is sufficient for most roasts, especially if you have vegetables that will also release moisture.
Good liquid choices include beef broth, chicken broth, vegetable broth, red wine, or even water. For aromatics, think onions, garlic, carrots, celery, herbs like rosemary and thyme, or bay leaves. These add depth and complexity that braising in the slow cooker naturally enhances. Layering these around and on top of the roast ensures even flavor distribution as it cooks.
Step 3: Setting the Timer: High or Low?
Now that your roast is prepped and nestled with aromatics and liquid, it's time to decide on the temperature setting and approximate cooking duration. This is where the earlier distinction between High and Low settings really comes into play. If you're aiming for that melt-in-your-mouth texture, especially with a tougher cut like chuck or brisket, the Low setting is your best bet.
For a typical 3-4 pound roast on the Low setting, lean towards 6 to 8 hours. This extended period allows the collagen in the meat to break down gradually, resulting in incredible tenderness and moistness. If time is a constraint and you need dinner ready sooner, the High setting can get the job done in about 3 to 5 hours for the same size roast. It’s a trade-off between time and the ultimate tenderizing process.
Step 4: Internal Temperatures: The Real Goal
While elapsed time and cooking settings are helpful guides, the most reliable way to know if your roast is done, and safe to eat, is by checking its internal temperature. This is crucial because not all roasts cook at the same rate, even within the same size and cut, due to variations in fat content and starting temperature.
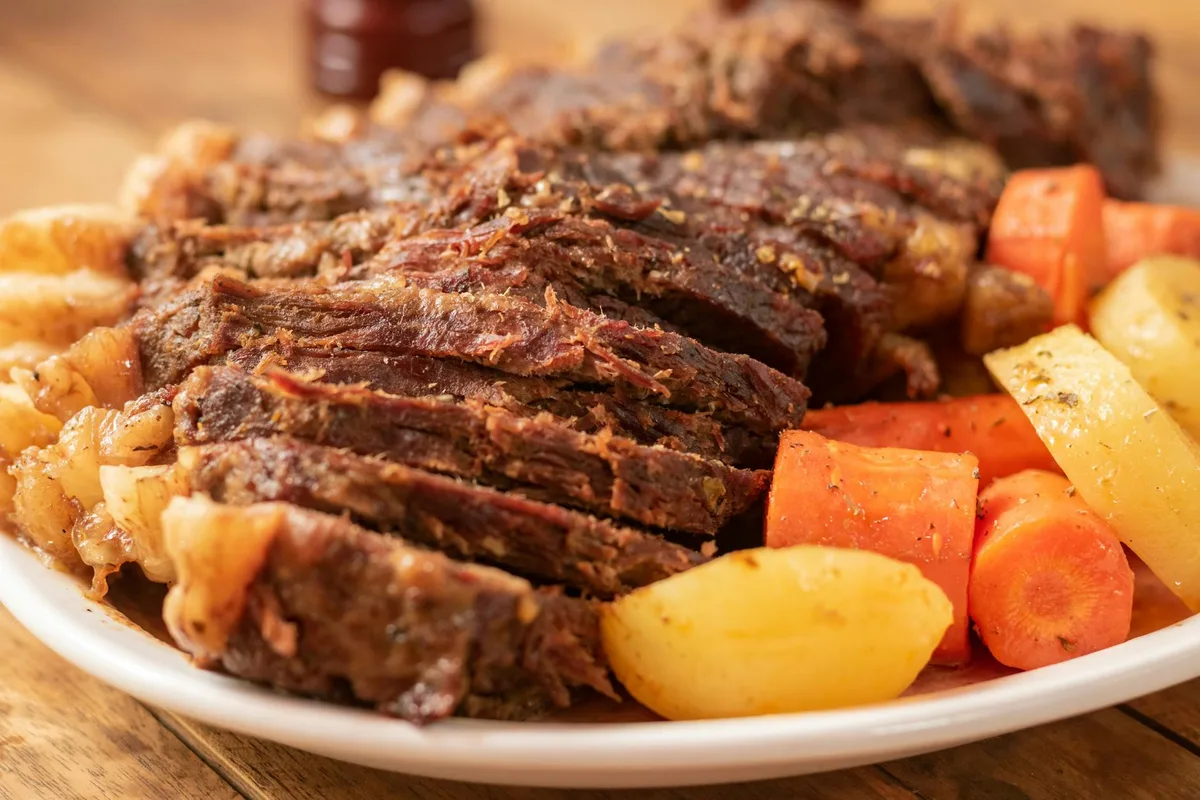
Using an instant-read meat thermometer is your best friend here. For most beef, pork, and lamb roasts cooked for tenderness (rather than, say, medium-rare steak), you're looking for an internal temperature of 195°F to 205°F (90°C to 96°C). At these temperatures, the connective tissues have fully broken down, making the meat exceptionally tender and easy to shred or slice. Always insert the thermometer into the thickest part of the roast, avoiding any bone if present.
Step 5: Resting: Don't Skip This!
Just like with a steak or a Thanksgiving turkey, letting your crock pot roast rest after cooking is non-negotiable. This resting period allows the juices within the meat to redistribute throughout the roast. If you were to slice into it immediately after taking it out of the crock pot, all those delicious, rendered juices would run out onto your cutting board, leaving the meat drier.
Plan for at least 15-20 minutes of resting time. You can loosely tent the roast with foil to keep it warm. During this time, the internal temperature will also continue to rise slightly (carry-over cooking), which is perfectly normal. This final step ensures that every bite is as moist and flavorful as the last.
Common Crock Pot Roast Mistakes to Sidestep
Even with a whole guide, it's easy to fall into a few common pitfalls when cooking roasts in a crock pot. Avoiding these simple errors can make the difference between a good meal and a truly spectacular one. Our research indicates these are the most frequent missteps home cooks encounter.
These aren't complex cooking techniques; they're fundamental misunderstandings about how slow cooking works and what truly indicates doneness. Getting these right means you won't have to send anyone to the store for a last-minute backup meal.
Mistake 1: Guessing the Time Too Much
The biggest mistake is relying solely on a set time and assuming it's foolproof. Recipes give estimates, but they can’t account for the exact thickness of your roast, how full your crock pot is, or even your specific appliance's calibration. Think of the clock as a suggestion, not a hard rule.
For example, a recipe might say "cook on low for 8 hours." If your roast is particularly lean or thinner than average, it might be perfectly tender and at safe temperature after 6 hours. Conversely, a very dense, large roast might need over 10 hours. This is why checking the internal temperature becomes so critical.
Mistake 2: Forgetting the Meat's Core Temp
Many home cooks will time their roast and pull it out once the timer goes off. However, without a thermometer, you’re only guessing if it’s actually reached the safe and tender temperature of 195°F to 205°F (90°C to 96°C). The meat might be flaky, but it could still be undercooked closer to the center if the cooking time was slightly off.
This is especially important for food safety. For beef, pork, and lamb, the USDA recommends certain minimum internal temperatures to ensure harmful bacteria are destroyed. A thermometer guarantees you hit these targets every time, preventing both undercooking and overcooking that can lead to dry, tough meat.
Mistake 3: Rushing the Rest
Pulling your roast straight from the crock pot to the cutting board is tempting, especially when hunger is setting in. But that steaming, fragrant roast is full of juices that are still actively moving. If you cut into it immediately, those juices will escape, leaving you with a dry roast.
Allowing at least 15-20 minutes for the roast to rest, loosely tented with foil, gives the muscle fibers time to relax and reabsorb those precious liquids. This step is non-negotiable for achieving that signature moist and tender result. It’s a small patience investment for a huge payoff in flavor and texture.
Beyond the Basics: Tips for a Perfect Crock Pot Roast
To elevate your crock pot roast from merely good to absolutely fantastic, consider a few expert tips that go beyond the essential steps. These can add layers of flavor and texture that will impress your family and guests alike. Many of these techniques are rooted in traditional braising methods, adapted for the convenience of slow cooking.
- Deglaze the Sear Pan: If you seared your roast, the pan will have browned bits (fond) stuck to the bottom. After removing the roast, pour a little of your chosen liquid (broth, wine) into the still-hot pan and scrape up all those flavorful bits. This browned-up liquid can then be added to your crock pot for an extra boost of flavor.
- Add Root Vegetables Later: Hearty root vegetables like potatoes and carrots are great in a crock pot, but they can sometimes turn to mush if added at the very beginning with a long cooking time. For perfectly tender but not disintegrated vegetables, try adding them during the last 2-3 hours of cooking on Low, or the last 1-1.5 hours on High.
- Thicken the Sauce: Once your roast is cooked and resting, the liquid left in the crock pot is often a flavorful base for a sauce or gravy. To thicken it, you can either make a slurry (mixing a tablespoon or two of cornstarch with an equal amount of cold water) and stirring it into the hot liquid, letting it simmer for a few minutes, or mix a tablespoon of flour with a tablespoon of softened butter to create a "beurre manié" and whisk that in.
- Don't Overfill: Ensure you don't fill your crock pot more than two-thirds full. Overfilling can lead to uneven cooking, as the heat won't be able to circulate properly. It can also cause liquid to bubble over, creating a mess and potentially affecting the cooking temperature.
Safety First: Cooking Temps You Can Trust
When it comes to cooking any type of meat, especially large roasts, food safety is paramount. The primary goal is to ensure that any potential harmful bacteria are eliminated through proper cooking temperatures. For crock pot roasts, this means understanding and hitting specific internal temperatures.
The United States Department of Agriculture (USDA) provides clear guidelines for safe cooking temperatures for various meats. For beef, pork, veal, and lamb roasts, the USDA recommends cooking them to an internal temperature of 145°F (63°C) for medium-rare, 160°F (71°C) for medium, and 170°F (77°C) for well-done. However, for tender crock pot roasts where the goal is shreddability and maximum tenderness, the target temperature is higher, typically 195°F to 205°F (90°C to 96°C). At these temperatures, not only is the meat safe, but the connective tissues have broken down for that desired fork-tender texture.